How To Hang Eyelet Curtain Without Any Difficulty


What Are Curtains With Eyelet?
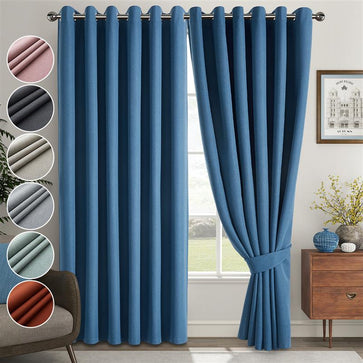
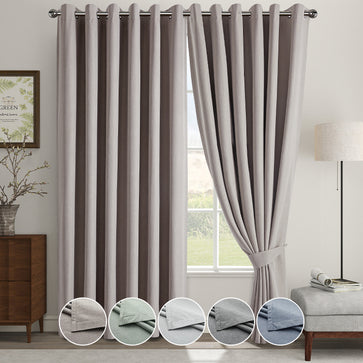
Eyelet curtains have holes at the top that are trimmed with metal. The hue of these holes in the metal is often silver. Most of the time, the range of eyelet curtains reach the floor and have gentle pleats going in a vertical direction down the fabric. It is possible to make an eyelet curtain panel out of heavy or lightweight fabric, and the panel itself might be lined with thin material.
Before hanging the eyelet curtains, a curtain rod can be threaded through the holes. You also can use curtain rings, which may be threaded through each hole and then arranged in a circle around the curtain pole. Both of these designs have the potential to be appealing depending on whether one would complement the aesthetic of a particular space more successfully.

20% OFF
GET FLAT 20% OFF ON YOUR FIRST PURCHASE
What Is The Use Of Eyelet Curtains?
Can you hang eyelet curtains on a pole? Both poles and tracks, made of metal, plastic, or wood, can be used to hang curtains. It is possible to make even more noticeable ruffles at the top of the curtain by adjusting the heading tape up and down. Whatever your style, you'll have an abundance of options with curtains, thanks to their many available colours in blackout eyelet curtains inclusing beige, black, cream, dark grey, light grey and navy.
Eyelet curtains are probably more ornate than other curtain types, such as eyelet curtains. This is especially true at the curtain's back, where several threaded strings that hold the cloth to the hoops must be undone in order to clean it. Because of this, maintaining pencil pleat curtains might be a little more challenging than maintaining eyelet curtains. However, with the appropriate décor, the extra work is well worth it.
Measurements For Eyelet Curtains
When taking measurements for curtains, it's crucial to remember that you'll need to leave space for the wrinkles. Considering the densely packed folds that span the entire length of the curtain, it will need to be much longer than if the fabric were taut. Therefore, you should stretch it taut before measuring. You must leave a small amount of room along either side of each drape so that they will credibly overlap when attaching eyelet curtains to a pole.
Curtain's Width
Measure the pole while it is in place for the best results. Add ten centimetres and multiply the overall width by two. Each curtain has a width like this.
Gather The Pleats
A set of loose strings will run through the heading. You can tighten the pleats by pulling these and altering the curtain's width. Make a loose knot before stuffing it in the pocket under the curtain's top. Simply tuck it into the space between the tape and the curtain if there isn't a pocket. You are now ready to begin pulling.
Remove The Tape From The Curtain's Top
Holding the strings at the end, you didn't tie up; carefully draw the curtain's top tape until it is the proper breadth before tying up the final set of threads.
Ensure That Pleating Is Distributed Equally Across The Width
Place the hooks after making sure the pleating is distributed equally over the width of the curtain. Space them about four inches apart.
It's time to hang the curtains at last. Make sure you're standing on an appropriate surface while doing this. A little stepladder is great, but if you only have access to a kitchen chair, that will do.
How To Hang Curtains With A Eyelet?
Although hanging curtain with hooks and rings aren't particularly difficult, it does take a little more time than hanging the other two styles. But don't worry; we'll go over each step in how to hang eyelet curtains on a track in great detail to make it as easy as possible.
Take A Measurement Of The Curtain Rod Or Track
Before doing anything else, gauge the curtain pole or track from beginning to end with a measuring tape. Divide this dimension in half and note the result to determine the width of your curtains.
Tie The Cords At The Heading's One End
You'll see that your curtain heading has three strands at each end. To create pleats in the heading, you must pull these tight. The threads suck through; if you don't secure one end, they might come out the other end or be lost. Simply create a double knot using the three strands when they are all together.
Retract The Strings
After tying a knot in one end, you can start drawing the cords on the opposite end to make pleats and narrow the curtain. Laying the curtain over a flat surface, like a table or ironing board, is the simplest way to accomplish this. If possible, spread a measuring tape above the curtain heading to monitor the breadth as you pull the cables tighter.
Suppose the curtain has an extra join half-width, the smaller panel on the outside. This allows fewer or no joins to be seen toward the centre.
Pull continuously until the breadth equals the measurement of the half you took before, plus a few centimetres to allow for some overlap. The tied cables can be nicely hidden behind the curtain header tape and on the outer margins.
Tie Off The Opposite Side
Use a slipknot to tie off the curtain cords at the opposite end this time. If you need to change the curtains at any time or take them down to wash them, this knot style will be easy to undo.
Pleats Sprucing
As you'll undoubtedly notice, the pleats in the heading are now rather unequal. Rearrange them slowly, trying to make each pleat about the width of a pencil.
Put The Hooks In
The number of hooks needed on each curtain is determined by dividing the number of curtain rings or track runners by half.
The curtain tape has three pockets on the back where you may connect hooks. This enables you to choose the curtain heading's height. Hooks should insert into the top pocket of any curtain pole you may have. Attach them to the middle or bottom pocket if you have a track.
Make sure the curtain has a hook at either end and space the remaining hooks four to five pockets or pleats apart.
Install The Curtains
You can now begin hanging your eyelet curtains! Just fasten these to your tracks or rings. Ensure the final hook on a curtain pole is positioned between the bracket and the final. If you have one, the last hook should be fastened to the fixed runner at the end of the track.
Do Eyelet Curtains Require A Track Or A Pole To Hang?
The absence of curtain poles and rods makes the curtains appear unkempt and ugly. It is possible to hang pencil pleat curtains with curtain poles and rods. Poles are necessary for hanging eyelet curtains. There will be a clear view of the track or pole. They can therefore appear more sophisticated when hanging from a decorated pole.
What Interior Designs And Spaces Work Best With Eyelet Curtains?
Because eyelet has a very traditional vibe, this often goes nicely with more traditional interior designs, particularly in cottages or older homes. However, for curtains in living rooms, dining rooms, and bedrooms, readymade curtains are quite popular. Blackout curtains are another choice; they have pleats that are threaded onto a pole. This style is incredibly modern, with wide, uniform pleats extending from top to bottom.